728x90

meta tag가 갑자기 생각나서 정리해 둠

<meta http-equiv="content-type" content="text/html; charset=euc-kr" /> :웹문서의 언어를 설정 (euc-kr)
<meta http-equiv="content-type" content="text/html; charset=utf-8" />    :웹문서의 언어를 설정 (utf-8)
<meta http-equiv="imagetoolbar" content="no" /> :그림위에 마우스 오버시 이미지 관련 툴바가 생기지 않음
<meta http-equiv="refresh" content="0; url=http://이동주소" /> :0초후 해당 페이지이동
<meta http-equiv="refresh" content="60" /> :60초마다 새로고침
<meta http-equiv="pragma" content="no-cache" />  : 캐쉬에서 해당페이지 읽어들이는 걸 방지

<meta name="subject" content="홈페이지주제" />
<meta name="title" content="홈페이지이름" />
<meta name="description" content="홈페이지 설명" />
<meta name="keywords" content="홈페이지 키워드" />
<meta name="author" content="홈페이지 주인 or 작성자" />
<meta name="publisher" content="만든단체나회사" />
<meta name="other Agent" content="웹책임자" />
<meta name="classification" content="카테고리위치(분류)" />
<meta name="generator" content="홈페이지 제작도구" />
<meta name="reply-to" content="메일주소" />
<meta name="filename" content="파일이름" />
<meta name="author-date" content="제작일" /> 
<meta name="location" content="홈페이지 위치(소속국가)" />
<meta name="distribution" content="배포자" />
<meta name="copyright" content="저작권" />
<meta NAME="content-language" content="kr" /> : 기술된 언어

메타태그의 검색로봇 관련
<meta name="robots" content="all" />                        : 로봇 검색을 허가함
<meta name="robots" content="none" />                    : 로봇 검색을 허가하지 않음
<meta name="robots" content="index,follow" />          : 이 문서도 긁어가고 링크된 문서도 긁어감.
<meta name="robots" content="noindex,follow" />       : 이 문서는 긁어가지 말고 링크된 문서만 긁어감.
<meta name="robots" content="index,nofollow" />       : 이 문서는 긁어가되, 링크는 무시함.
<meta name="robots" content="noindex,nofollow" />   : 이 문서도 긁지 않고, 링크도 무시함.


728x90

'Developer > CSS & HTML' 카테고리의 다른 글

Tistory CSS  (0) 2008.02.19
검색엔진 노출방지 robots.txt & meata tag  (0) 2008.02.04
DOCTYPE 선언  (0) 2007.11.22
728x90
<OBJECT id=playera height=230 width=230 classid=clsid:22D6F312-B0F6-11D0-94AB-0080C74C7E95>
<PARAM NAME="AutoStart" VALUE="True">
<PARAM NAME="Balance" VALUE="False">
<PARAM NAME="DisplaySize" VALUE="True">
<PARAM NAME="Filename" VALUE="">
<PARAM NAME="Mute" VALUE="False">
<PARAM NAME="SelectionStart" VALUE="False">
<PARAM NAME="SelectionEnd" VALUE="False">
<PARAM NAME="ShowControls" VALUE="True">
<PARAM NAME="ShowAudioControls" VALUE="True">
<PARAM NAME="ShowDisplay" VALUE="False">
<PARAM NAME="ShowPositionControls" VALUE="False">
<PARAM NAME="Volume" VALUE="1">
<PARAM NAME="AudioStream" VALUE="False">
<PARAM NAME="AutoSize" VALUE="False">
<PARAM NAME="AnimationAtStart" VALUE="False">
<PARAM NAME="AllowScan" VALUE="False">
<PARAM NAME="AllowChangeDisplaySize" VALUE="False">
<PARAM NAME="AutoRewind" VALUE="True">
<PARAM NAME="BaseURL" VALUE="">
<PARAM NAME="BufferingTime" VALUE="5">
<PARAM NAME="CaptioningID" VALUE="">
<PARAM NAME="ClickToPlay" VALUE="True">
<PARAM NAME="CursorType" VALUE="0">
<PARAM NAME="CurrentPosition" VALUE="True">
<PARAM NAME="CurrentMarker" VALUE="True">
<PARAM NAME="DefaultFrame" VALUE="mainframe">
<PARAM NAME="DisplayBackColor" VALUE="True">
<PARAM NAME="DisplayForeColor" VALUE="16777215">
<PARAM NAME="DisplayMode" VALUE="1">
<PARAM NAME="Enabled" VALUE="-1">
<PARAM NAME="EnableContextMenu" VALUE="False">
<PARAM NAME="EnablePositionControls" VALUE="False">
<PARAM NAME="EnableFullScreenControls" VALUE="False">
<PARAM NAME="EnableTracker" VALUE="False">
<PARAM NAME="InvokeURLs" VALUE="False">
<PARAM NAME="Language" VALUE="False">
<PARAM NAME="PlayCount" VALUE="1">
<PARAM NAME="PreviewMode" VALUE="False">
<PARAM NAME="ShowStatusBar" VALUE="True">
<PARAM NAME="TransparentAtStart" VALUE="False">
</OBJECT>


Here is a table of some of the common parameters used in the above examples
Parameter Default Description
autoStart true Specifies or retrieves a value indicating whether the current media item begins playing automatically.
balance 0 Specifies the current stereo balance.
Values range from �100 to 100.
baseURL
Specifies the base URL used for relative path resolution with URL script commands that are embedded in media items.
captioningID 0 Specifies the name of the element displaying the captioning.
currentMarker 0 Specifies the current marker number.
currentPosition 0 Specifies the current position in the media item in seconds.
defaultFrame - Specifies the name of the frame used to display a URL.
enableContextMenu true Specifies a value indicating whether to enable the context menu, which appears when the right mouse button is clicked.
enabled false Specifies whether the Windows Media Player control is enabled.
fullScreen false Specifies whether video content is played back in full-screen mode.
InvokeURLs true Specifies a value indicating whether URL events should launch a Web browser.
Mute false Specifies if audio is muted.
PlayCount 1 Specifies the number of times a media item will play. Minimum value of one.
Rate 1.0 Specifies the playback rate.
0.5 equates to half the normal playback speed, 2 equates to twice.
stretchToFit false Specifies whether video displayed by the control automatically sizes to fit the video window, when the video window is larger than the dimensions of the video image.
uiMode full Specifies which controls are shown in the user interface.
Possible values: invisible, none, mini, full.
URL - Specifies the name of the media item to play.
You can specify a local filename or a URL.
Volume Last setting Zero specifies no volume and 100 specifies full volume.
windowlessVideo false Specifies or retrieves a value indicating whether the Windows Media Player control renders video in windowless mode.
When windowlessVideo is set to true, the Player control renders video directly in the client area, so you can apply special effects or layer the video with text.
Supported by Windows Media Player for Windows XP or later.

출처 : http://www.streamalot.com/wm-embed.shtml


728x90

'Information' 카테고리의 다른 글

도메인업체 가격비교  (6) 2009.05.25
프로젝트 관리(Project Managment) 용어  (0) 2009.05.14
나를 위한 일의 심리학  (0) 2009.03.14
728x90

Embed 태그는 mp3, asf, wma, wmv, swf 등 동영상 관련 파일들을 게시판에 포함시킬 때 일반적으로 사용하는 태그이다(Object 태그도 Embed 태그와 동일한 용도로 사용된다.).

1. 기본형
  <embed src="mms://vod.test.org/sample/content01.wmv“>
 - src: 음악 파일의 주소

사용자 삽입 이미지
옵션 없이 실행했을 때의 플레이어의 모습.


2. 플레이어의 크기 조절
음악 파일이나 동영상을 재생할 때 Embed 태그의 width, height 값을 설정하지 않으면 기본 크기로 재생이 됩니다. 사용자가 동영상의 크기를 조절할 필요가 없다면 생략하는 것이 좋습니다.
  <embed src="mms://vod.test.org/sample/content01.wmv“ width=640 height=480>


3. 플레이어의 형태 변경하기
Embed 태그의 속성값을 변경하여 플레이어의 모양을 마음대로 변경할 수 있습니다. 속성 값은 true(보이기)나 false(감추기) 값을 가질 수 있으며, true나 false 대신에 1과 0으로 설정할 수도 있습니다.
사용자 삽입 이미지

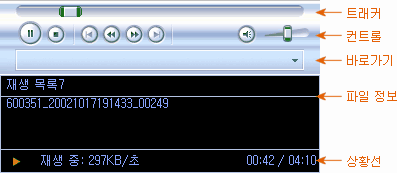
 1) 트래커, 컨트롤 바 보이기: showcontrols=true(디폴트)
    (showtracker: 트랙커, showaudiocontrols: 볼륨콘트롤, showpositioncontrols: 이전 곡, 다음 곡 버튼 등으로 세부 설정도 가능)
 2) 바로가기 보이기: showgotobar=true
 3) 파일정보 보이기: showdisplay=true
 4) 상황선 보이기: showstatusbar=true
이들 속성은 중복 설정이 가능하며, 모든 속성을 다 설정하면 위 그림과 같다.


4. 추천하는 플레이어 모양
너무 많은 플레이어의 모양을 꺼네 놓으면 화면만 차지하므로 적절한 형태를 추천한다.
사용자 삽입 이미지

  <embed src="mms://vod.test.org/sample/content01.wmv" showcontrols=true showstatusbar=true>


5. 기타 속성
 1) 자동 시작: autostart=true(디폴트)
 2) 재생 횟수: loop=1(디폴트)
    loop=3(3회 반복 재생), loop=0(무한 반복)
 3) 재생 볼륨: volume=-6000(디폴트)
   volume 값은 -10000~0 사이의 값을 갖는다.
 4) 좌우 밸런스: balance=0(디폴트)
   밸런스 값은 -10000~10000 사이의 값을 갖는다.
 5) 플레이어 감추기: hidden=false(디폴트)
 6) 메뉴 금지: enablecontextmenu=false(디폴트)
    오른쪽 마우스를 사용할 수 없도록 한다.

추천 예)
노래: <embed src="노래주소" showcontrols=true showstatusbar=true autostart=true loop=0 volume=0 hidden=false>
동영상: <embed src="동영상주소" showcontrols=true showstatusbar=true>


6. 플레이어에 색깔 넣기
플레이어에 색깔을 넣는 것은 사실은 색깔을 넣는 것이 아니라 Embed에 필터를 적용하는 것입니다.
 style="filter:gray()": 회색
 style="filter:xray()": 검정색

사용 예)
  <embed src="mms://vod.ninenine.org/sample/video01.wmv" style="filter:gray()">

728x90

'Information' 카테고리의 다른 글

Adobe RIA World 2008 발표자료  (0) 2008.04.11
다국어 사이트를 위한 Charset and Codepage  (0) 2008.04.07
NHN의 웹 접근성 관계요소 표  (2) 2008.04.07
728x90
http://www.robotstxt.org/


로봇배제 표준이란?

로봇배제 표준이란 구글 등 검색로봇이 정보 수집을 위해 사이트를 방문할 경우를 대비하여, 검색로봇에 의한 웹 사이트의 디렉터리 및 파일들에 대한 검색 조건을 명시해 놓은 국제 규약이다.
정상적인 검색로봇은 사이트 방문 시 가장 먼저 웹사이트의 로봇배제 표준파일(robots.txt)을 확인하고 파일에 명시된 사항을 준수하면서 웹사이트의 컨텐츠를 수집한다.
※ 로봇배제 표준은 방지기술이 아닌 사이트 및 검색로봇 운영자간의 단순한 약속(규약)이므로 악의적인 로봇의 경우 로봇 배제 표준을 무시하고 사이트의 컨텐츠를 수집할 수도 있다.

/robots.txt 파일 내용

1. 홈페이지 전체 내용을 모든 검색엔진에 노출 허용

User-Agent : *
Disallow :

2. 홈페이지 전체 내용을 모든 검색엔진에 노출 방지

User-Agent : *
Disallow : /

3. 홈페이지의 디렉터리가 information인 것에 대한 노출을 방지

User-Agent : *
Disallow : /information/

4. 특정 검색엔진(googlebot)의 접근만을 거부

User-Agent : googlebot
Disallow: /
User-Agent: *
Disallow:

5. 특정 검색엔진(googlebot)의 접근만을 허가

User-Agent : googlebot
Disallow :
User-Agent : *
Disallow: /

6. 모든 검색엔진에 대해 /directory/index.html의 접근을 거부

User-Agent : *
Disallow : /directory/index.html

7. 홈페이지의 디렉터리가 information인 것에 대한 노출을 허가

User-Agent : *
Allow : /information/

8. 홈페이지의 디렉터리 또는 파일명이 information인 것에 대한 접근을 허가

User-Agent : *
Allow : /information


- User-Agent : '*' :모든 User-Agent, 특정 User-Agent 를 지정할 경우 해당 로봇 이름을 입력
- Allow or Disallow
Disallow에서 '/'는 모든 하위 문서에 대한 배제를 의미, 아무것도 쓰지 않으면 허가를 의미
'/...../'는 디렉터리만, '/....' 는 디렉터리+파일이 적용대상


- Meta Tag를 통한 노출방지

<html>
<head>
<title>...</title>
<META NAME="ROBOTS" CONTENT="NOINDEX, NOFOLLOW">

</head>
noindex 면 그 페이지는 긁어가지 않습니다.
nofollow면 링크를 확인해서 긁어가는 것을 건너 뜁니다.

<META NAME="ROBOTS" CONTENT="NOINDEX, FOLLOW">
-이 문서는 긁어가지 말고 링크된 문서만 긁어감

<META NAME="ROBOTS" CONTENT="INDEX, NOFOLLOW">
-
이 문서도 긁어가고 링크된 문서도 긁어감

<META NAME="ROBOTS" CONTENT="NOINDEX, NOFOLLOW">

- 이 문서도 긁지 않고, 링크도 무시함


728x90

'Developer > CSS & HTML' 카테고리의 다른 글

Tistory CSS  (0) 2008.02.19
DOCTYPE 선언  (0) 2007.11.22
텍스트파일 내용을 테이블로 불러오기  (0) 2007.05.27
728x90
document.getElementsByTagName

.....내 머리는 붕어


-Tag Count
document.getElementsByTagName("태그명").length

-Tag Item Value
document.getElementsByTagName("태그명").item(0).value

-Tag Item Focus
document.getElementsByTagName("태그명").item(0).focus();

.....내 머리속의 붕어
.....망할....OTL;;
728x90

'Developer > JavaScript' 카테고리의 다른 글

Override window.alert()  (0) 2008.02.04
JavaScript Submit Function  (0) 2007.08.02
자바스크립트 라이브러리의 종류와 특징  (0) 2007.06.22
728x90
!DOCTYPE 선언은 XHTML문서가 갖추어야 될 필수 Element입니다. XHTML로 DTD 선언을 하지 않으면 그 문서는 XHTML 문서가 아닙니다. 뒤에나오는 XHTML 유효성 검사(XHTML Validation)를 하면 XHTML문서로 인정되지 않습니다. XHTML도 역시 HTML 4.01과 마찬가지로 다음과 같은 3가지 DTD를 선언할 수 있습니다. 아래의 3가지 중에 가장 많이 사용되며, 접근하기 쉬운 DTD는 Transitional mode 가 되겠습니다.

Strict Mode DTD
    * W3C에서 사실상 가장 권장하는 DTD 입니다. Strict 라는 단어의 뜻에서 알 수 있듯이 문법적인 오류를 전혀 허용하지 않는 DTD 선언입니다. 또한 문서를 꾸밀 때 배경색, 글자색 등을 모두 W3C의 CSS를 사용해야 되며, font, basefont 등의 Deprecated로 지정된 HTML Element의 사용 또한 금지됩니다. 예를 들어 글자색을 "red"로 지정하고 싶다면
          o <font color="red">Stric Mode</font> 와 같이 사용하면 안되고
          o <span style="color:red;">Stric Mode</span> 처럼 CSS를 사용해서 글자색을 지정해야 됩니다.
    * 또 한가지의 예로써 문서의 배경색을 'blue'로 지정하려면
          o <body bgcolor="blue">로 사용하면 안되고
          o <body style="background-color:blue;">로 사용해야 됩니다.
    * 사용법
          o <!DOCTYPE html PUBLIC "-//W3C//DTD XHTML 1.0 Strict//EN" "http://www.w3.org/TR/xhtml1/DTD/xhtml1-stric.dtd">


Transitional Mode DTD
    * Transitional Mode의 경우 XHTML 문법을 지키는 것은 마찬가지 이지만 Deprecated Element의 사용이 허용되며, body Element의 bgcolor, text 등의 Attribute를 사용할 수 있습니다.
    * 사용법
          o <!DOCTYPE html PUBLIC "-//W3C//DTD XHTML 1.0 Transitional//EN" "http://www.w3c.org/TR/xthml1/DTD/xhtml1-Transitional.dtd">


Frameset Mode DTD
    * frameset Mode의 경우는 이 사이트의 경우처럼 브라우저 창을 2개 이상으로 분할하여 사용하고 싶을 때 Frameset페이지에 선언해 줍니다.
    * 사용법
          o <!DOCTYPE html PUBLIC "-//W3C//DTD XHTML 1.0 Frameset//EN" "http://www.w3.cor/TR/xhtml1/DTD/xhtml1-frameset.dtd">

 
XHTML 문서의 구성
    XHTML은 크게 나누어 아래의 3부분으로 이루어져 있습니다.
        * DOCTYPE 선언부분
        * Head 부분
        * body 부분
    위의 3 부분으로 기본적인 문서의 구조를 만들면 아래와 같습니다.

XHTML의 기본적인 문서 구조
<!DOCTYPE ...>
<html>
    <head>
        <title>... </title>
    </head>
    <body>... </body>
</html>

이중에서 DOCTYPE 선언(DTD 선언)은 항상 문서의 첫 부분에 나오게 되며 한 번 이상 선언할 수 없습니다.
좀 더 구체적인 문서의 예제
    위에서 설명한 DOCTYPE, head, body 의 3부분으로 아래의 간단한 문서를 만들어 보았습니다. 아래의 문서 예제에서는 Stict Mode DTD를 사용하였습니다. 이 DTD 선언 부분만 뺀다면 일반적인 HTML 문서와 같은 구조가 되겠습니다.

<!DOCTYPE html PUBLIC "-//W3C//DTD XHTML 1.0 Stric//EN" "http://www.w3.org/TR/xhtml1/DTD/xhtml1-strict.dtd">
<html>
    <head>
        <title>간단한 문서의 예제</title>
    </head>
    <body>
        <p>내용</p>
    </body>
</html>
728x90
728x90
지금 소개하는 방법은 서버에 txt파일을 CGI프로그램의 도움이 없이도 항상 동적으로 불러서 화면에 출력해주는 Active X의 활용방법입니다. 즉, 웹서버측에 다음과 같은 table_list.txt 파일이 있고, 이를 자동으로 테이블로 구성하여 보여줍니다.

table_list.txt 파일의 구성내용은 아래와 같습니다.
no,성별,이름,나이,주소,전화번호
1,남,홍길동,30,광주광역시 동구,062-444-1111
2,여,유관순,32,전라남도 여수시,061-777-7777
3,남,이순신,45,서울특별시 강남구,02-111-0000
4,여,심청이,23,서울특별시 동작구,011-600-0000
5,남,심봉사,55,경상남도 마산시,016-555-0000
6,남,대통령,77,강원도 춘천시,011-000-0000

NO. 성별 이름 나이 주소 전화번호
1
홍길동
30
광주광역시 동구
062-444-1111
2
유관순
32
전라남도 여수시
061-777-7777
3
이순신
45
서울특별시 강남구
02-111-0000
4
심청이
23
서울특별시 동작구
011-600-0000
5
심봉사
55
경상남도 마산시
016-555-0000
6
대통령
77
강원도 춘천시
011-000-0000

<object classid="clsid:333C7BC4-460F-11D0-BC04-0080C7055A83" width="1" height="1" id="clist" border="0">
<param name="DataURL" value="/SRC/javascript/table_list.txt">
<param name="UseHeader" value="True">
</object>

<center>
<table border=0 cellpadding=3 width=450 cellspacing=1 bgcolor=999999 datasrc="#clist">
<THEAD>
   <tr align=center bgcolor=efefef>
     <td><b>NO.</b></td>
     <td><b>성별</b></td>
     <td><b>이름</b></td>
     <td><b>나이</b></td>
     <td><b>주소</b></td>
     <td><b>전화번호</b></td>
   </tr>
</THEAD>
<TBODY>
   <tr bgcolor=white align=center>
     <td><DIV DATAFLD="no"></DIV></td>
     <td><DIV DATAFLD="성별"></DIV></td>
     <td><DIV DATAFLD="이름"></DIV></td>
     <td><DIV DATAFLD="나이"></DIV></td>
     <td><DIV DATAFLD="주소"></DIV></td>
     <td><DIV DATAFLD="전화번호"></DIV></td>
   </tr>
</TBODY>
</table>

728x90

'Developer > CSS & HTML' 카테고리의 다른 글

검색엔진 노출방지 robots.txt & meata tag  (0) 2008.02.04
DOCTYPE 선언  (0) 2007.11.22
70 Expert Ideas For Better CSS Coding  (0) 2007.05.11
728x90
원문 : http://www.mozilla.or.kr/docs/web-developer/standard/

실전 웹 표준 가이드 (2005)

본 가이드는 XHTML, CSS, DOM, ECMAScript 등 모든 웹 표준에 대한 이슈를 새롭게 정리하고, 웹 개발 프로젝트에서 표준을 준수하는 방법을 제공하는 가이드 입니다.

목 차

  • 웹 표준이란 무엇인가?
  • 실전 XHTML 가이드
    • XTHML 소개
    • XHTML 일반 문법 준수
    • 구조적 XHTML 사용 방법
  • 실전 CSS 레이아웃
    • CSS 개념 및 소개
    • CSS 레이아웃(LAYOUT) 기초
    • 실전 예제를 통한 CSS 레이아웃
    • 고급 CSS 레이 아웃
  • 실전 DOM/Script 가이드
    • W3C DOM vs. MS DOM
    • 표준 JAVASCRIPT 사용 방법
    • 올바른 플러그인(PLUGIN) 사용
  • 실전 표준 웹 프로그래밍
    • 표준 MIME 타입 설정
    • 표준 문자 인코딩 지정
  • 실전 웹 표준 개발 프로세스
    • 현재 프로세스 소개(Waterfall 방식)
    • 개선된 모델(퍼블리셔 중심)
    • 새로운 개발 프로세스
  • 맺음말
  • 부록 : 웹 표준 사양-브라우저 호환차트
- URL: http://www.mozilla.or.kr/docs/web-developer/web-standard-guide-2005.pdf
- 인쇄 버전 : PDF 파일 (223pp), PDF 파일(부록 포함, 305pp)

웹 표준 기반 홈페이지 구축 가이드 (2004)

본 가이드는 브라우저 호환성 유지 방법은 물론 XHTML/CSS 레이아웃을 통한 홈페이지 개발 방법을 소개한 가이드 입니다.

목 차

  • 1부 브라우저 호환성 유지 방안
    • 현대 웹사이트 제작의 방향
    • W3C 표준안
    • 정확한 문서 형식 사용
    • 올바른 HTML 및 CSS 사용 방법
    • 올바른 객체 모델 및 자바스크립트 사용 방법
    • 웹페이지 디버깅 도구 사용
  • 2부 웹표준 기반 페이지 제작 방법
    • 구조와 표현의 분리
    • XHTML를 사용해야 하는 이유
    • XHTML의 주요 특징
    • CSS 사용 방법
    • CSS 레이아웃 vs.Table 레이아웃
- 인쇄 버전 : PDF 파일

Cross Browsing 가이드(2003)

본 가이드는 각 웹 브라우저의 비 표준 기능과 이를 극복할 수 있는 방법을 위주로 작성된 것입니다.

목 차

- 인쇄 버전 : PDF 파일
728x90
728x90

<!---- Progress Bar ---->

<html>
<head>
<meta http-equiv="Content-Type" content="text/html; charset=utf-8">
<title>::Libmeta - Searching...</title>

<script language='javascript'>
<!--

var maxLength = 400;

/*

 * 문서내의 progressBar란 객체를 초기화하여 증가를 준비한다.

 * 그리고 progressBar객체를 (parameter t의 값*10)만큼의 시간동안 주기적으로

 * growUp()함수를 실행한다.

 */

function execute(t) {
    totalTime = t*10;
    barSize=0;
    document.all.progressBar.style.border = '1 solid black';
    document.all.progressBar.style.height = '8';
    moveNow = setInterval("growUp()",totalTime);
}

/*

 * 문서내의 progressBar객체를 너비 +10씩 최종 maxLength에 지정한 길이까지 증가시킨다.

 */

function growUp() {
    barSize += eval(10);
    document.all.progressBar.style.width = barSize;
    if(barSize >= maxLength) {
        clearInterval(moveNow);
    }
}

//-->
</script>
</head>


<!-- 보기좋으라고 걍 margin을 없앰 -->

<body style="margin:0;" onLoad="execute(10);">
<table width=700 height=80%>
<tr>
 <td
align=center valign=middle>
<!-- 이곳의 Table너비를 maxLength와 맞춰준다. -->

 <table cellpadding=0 cellspacing=0 width=400>
  <td><div align=center style="font:9pt dotum; color:dodgerblue;">검색중입니다...</div><br>
<!-- progress bar object -->

  <div id="progressBar" style="height:10; border:0; width:0; background-color:#FFEF9F;"><img src="" height=2 width=0></div></td>
 </tr>
</table></td>
</tr>
</table>

</body>
</html>

<!------------------------------------------------------------------

시간 t에 따른 로딩을 표시하기 위한 예제인데..

사실 실제 데이터와의 실시간적 매칭이 아닌 눈가림용이란걸 알수 있다.ㅋㅋ

다른응용도 가능할 것이며.. setInterval의 예제로 생각해도 좋을 듯..?

------------------------------------------------------------------->

728x90

'Developer > JavaScript' 카테고리의 다른 글

SELECT Element간 ITEM이동  (0) 2007.05.02
이메일 주소 검증  (0) 2007.05.02
How to use multiple window.onload events with external scripts  (0) 2007.05.02
728x90

출처 : http://www.smashingmagazine.com/2007/04/10/online-converters/


Online converters always come in handy. Once you need to perform some operation with your files, they can save your time achieving the same results online, without installing some specific software. In fact, there are many online tools, which convert formats, files and code snippets for free. Some of them are quite specific tools aimed for developers, but some are common “all-rounders”, which manage to convert almost every format to a more popular one. Using them, you can generate .pdf-documents out of images, images out of texts or RSS-feeds out of web-sites. You can also convert any audio- and video-files immediately - the results can be received via e-mail.

So what can you use? What should you use?

This overview of online-converters for users and developers might give you some useful starting points and improve your productivity.

“All-Rounders”

  • Media-Convert
    Media-Convert can deal with many formats. Most important are Text, HTML, XHTML, Microsoft Word, RTF, PDF, PS, Open Office, Star Writer, CSV, dBase, Microsoft Excel, Pocket Excel, Lotus 123, Quattro Pro, Star Calc, Open Office, MathML, Open Office Formeln, Powerpoint. Besides: Video and Audio-formats.
  • txt2tags
    This tool generates HTML, XHTML, SGML, LaTeX, Lout, Man Page, MoinMoin, MagicPoint and PageMaker-documents out of a single plain text-file with minimal markup.
  • Zamzar
    Zamzar supports conversion between a wide variety of different file formats. Many conversion options, among them 11 document formats, 8 image formats, 9 audio formats and 12 video formats.

Development

HTML & CSS

  • Text to JavaScript
    If you’ve ever tried to make some normal text containing characters like ‘ into a JavaScript variable, you will know how frustrating it can be when you miss one, or you miss a \ or a line break or a tag. Well, let this script do it for you.
  • CSS HTML
    Converts CSS-code to HTML and HTML to CSS-Code.
  • HTML2TXT
    Converts HTML in plain text.
  • HTML2Wiki
    Converts HTML to Wiki-Markup
  • HTML -> PHP, JavaScript, ASP
    This program let you convert your HTML in various scripting languages such as: HTML to PHP, HTML to Javascript and HTML to ASP
  • Draac.Com’s Html To Javascript
    Type or paste your Html codes into the text box below, then press the button and convert your Html coding to Javascript.
  • HTML to JavaScript Convertor
    This tool takes your markup and converts it to a series of document.write() statements that you can use in a block of JavaScript.

Graphics

Color

PDF

  • HTML 2 PDF
    Converts HTML and whole sites to PDF
  • Online PDF Converter
    You can generate plain text, .jpg-, .png-, .gif- or .tiff-images out of .pdf-files.
  • PDF Conversion
    PDF -> Text.
  • Show PDF
    PDF -> HTML.
  • PDF Online
    Converts MS Word (DOC), MS Publisher (PUB), MS Word (RTF), MS Excel (XLS), MS PowerPoint (PPT), HTML (MHT), MS PowerPoint (PPS), Text (TXT) and JPG, PNG, BMP, TIFF, WMF, EMF, GIF to PDF online. The .pdf-file is sent via e-mail.

RSS

  • Feed43
    Generates RSS-feeds out of web-sites
  • RSS2GIF
    This tool converts RSS-feeds to images.
  • RSS/RDF
    RSS -> JavaScript.
  • RSSxl
    Converts web-sites to RSS 2.0.

Further converters


728x90

'Developer' 카테고리의 다른 글

정규표현  (0) 2008.01.29
14 Tab-Based Interface Techniques  (0) 2007.04.18
HTTP Status Code  (0) 2007.04.08
728x90
Special Characters(특수문자코드)
웹페이지를 만들때 꼭 필요한 Special Characters(특수문자코드) 입니다

만일 특수문자가 브라우저에 나타나지 않으면 익스플로러 에서는 "보기" -> "글꼴" 선택에서 다른 종류들을 선택합니다. 넷스케이프 에서는 "보기" -> "인코딩"을 선택하면 한글 이외에 영문코드를 선택할 수 있습니다.


HTML에서 특수문자를 나타내는 방법은 두가지가 있습니다.
하나는 Numeric HTML entity(아스키 코드)이고
다른 하나는 Symbolic HTML entity(문자 지정)입니다.
간 단히 말해서 전자는 숫자로, 후자는 문자로 나타내는 방법인데 익스플로러에서는 둘다 제대로 나타나지만 넷스케이프에서는 Numeric HTML entity(아스키 코드)가 상당부분 제 기능을 하지 못하기 때문에 Symbolic HTML entity(문자 지정)로 나타내야 합니다.

예를들어 공백문자를 넣을때 사용하는 특수문자인 &#160;나 &nbsp; 사용시 익스플로러에서의 실행은 모두가 되지만 넷스케이프에선는 &nbsp;를 넣어 주어야 합니다.

Additional characters from ISO 8859-1

아스키코드 문자지정 표시 표시 내용 아스키코드 문자지정 표시 표시 내용
&#160; &nbsp;   non-breaking space &#177; &plusmn; ± plus-or-minus sign
&#161; &iexcl; ¡ inverted exclamation mark &#178; &sup2; ² superscript two
&#162; &cent; ¢ cent sign &#179; &sup3; ³ superscript three
&#163; &pound; £ pound sign &#180; &acute; ´ acute accent
&#164; &curren; ¤ general currency sign &#181; &micro; µ micro sign
&#165; &yen; ¥ yen sign &#182; &para; pilcrow (paragraph sign)
&#166; &brvbar; ¦ broken (vertical) bar &#183; &middot; · middle dot
&#167; &sect; § section sign &#184; &cedil; ¸ cedilla
&#168; &uml; ¨ umlaut/dieresis &#185; &sup1; ¹ superscript one
&#169; &copy; © copyright sign &#186; &ordm; º ordinal indicator, male
&#170; &ordf; ª ordinal indicator, fem &#187; &raquo; » angle quotation mark, right
&#171; &laquo; « angle quotation mark, left &#188; &frac14; ¼ fraction one-quarter
&#172; &not; ¬ not sign &#189; &frac12; ½ fraction one-half
&#173; &shy; ­ soft hyphen &#190; &frac34; ¾ fraction three-quarters
&#174; &reg; ® registered sign &#191; &iquest; ¿ inverted question mark
&#175; &macr; ¯ macron &#215; &times; × multiply sign
&#176; &deg; ° degree sign &#247; &div; ÷ division sign

ISO Latin-1 characters

문자지정 표시 표시 내용 문자지정 표시 표시 내용
&Agrave; À capital A, grave accent &iuml; ï small i, diæresis/umlaut
&agrave; à small a, grave accent &ETH; Ð capital Eth, Icelandic
&Aacute; Á capital A, acute accent &eth; ð small eth, Icelandic
&aacute; á small a, acute accent &Ntilde; Ñ capital N, tilde
&Acirc; Â capital A, circumflex &ntilde; ñ small n, tilde
&acirc; â small a, circumflex &Ograve; Ò capital O, grave accent
&Atilde; Ã capital A, tilde &ograve; ò small o, grave accent
&atilde; ã small a, tilde &Oacute; Ó capital O, acute accent
&Auml; Ä capital A, diæresis/umlaut &oacute; ó small o, acute accent
&auml; ä small a, diæresis/umlaut &Ocirc; Ô capital O, circumflex
&Aring; Å capital A, ring &ocirc; ô small o, circumflex
&aring; å small a, ring &Otilde; Õ capital O, tilde
&AElig; Æ capital AE ligature &otilde; õ small o, tilde
&aelig; æ small ae ligature &Ouml; Ö capital O, diæresis/umlaut
&Ccedil; Ç capital C, cedilla &ouml; ö small o, diæresis/umlaut
&ccedil; ç small c, cedilla &Oslash; Ø capital O, slash
&Egrave; È capital E, grave accent &oslash; ø small o, slash
&egrave; è small e, grave accent &Ugrave; Ù capital U, grave accent
&Eacute; É capital E, acute accent &ugrave; ù small u, grave accent
&eacute; é small e, acute accent &Uacute; Ú capital U, acute accent
&Ecirc; Ê capital E, circumflex &uacute; ú small u, acute accent
&ecirc; ê small e, circumflex &Ucirc; Û capital U, circumflex
&Euml; Ë capital E, diæresis/umlaut &ucirc; û small u, circumflex
&euml; ë small e, diæresis/umlaut &Uuml; Ü capital U, diæresis/umlaut
&Igrave; Ì capital I, grave accent &uuml; ü small u, diæresis/umlaut
&igrave; ì small i, grave accent &Yacute; Ý capital Y, acute accent
&Iacute; Í capital I, acute accent &yacute; ý small y, acute accent
&iacute; í small i, acute accent &THORN; Þ capital Thorn, Icelandic
&Icirc; Î capital I, circumflex &thorn; þ small thorn, Icelandic
&icirc; î small i, circumflex &szlig; ß small sharp s, German sz
&Iuml; Ï capital I, diæresis/umlaut &yuml; ÿ small y, diæresis/umlaut
728x90

'Information' 카테고리의 다른 글

비스타 하드웨어 ‘체크포인트’  (0) 2007.03.13
HTTP 에러 코드 및 내용  (0) 2007.03.04
주민번호 체크 검사  (0) 2007.03.04
728x90

웹에디터, web editor 소스 (학습용)

기본 원리는 IFAME의을 편집 할 수 있도록 하고 자바스크립트에서 DHTML편집 할 수 있는 형태이며 저장은 자바스크립트에서 값을 변환 하고 넘기는 방식 입니다.


1. 편집창 만들기

편집창은 iframe태그를 사용 합니다.

<iframe></iframe>

속성으로는 다음과 같은 것들이 있습니다.

src="" iframe에서 연결 시킬 경로 width="" 너비 height="" 높이 name="" 이름으로 FRAME의 이름과 동일 하며 taget의 대상이 될 수 있습니다.

예) <iframe src="http://www.yahoo.co.kr" width="700" height="400" name="html"></ifame>

ifrme은 반드시 종료태그가 있어야 합니다.


IFRAME은 FRAME을 이미지 형식으로 만드는 태그 입니다. 하지만 일반형식은 브라우저의 내용을 그냥 읽어오는 형식 입니다. 그래서 편집 가능 하도록 자바스크립트에서 만들어 줍니다.


<HTML>

<HEAD>
<TITLE>웹에디터 예제1</TITLE>
</HEAD>

<BODY>
<IFRAME NAME=dhtmlframe></IFRAME>
<SCRIPT LANGUAGE="JavaScript">
<!-- JavaScript
    dhtmlframe.document.designMode = "On"
// - JavaScript - -->
</SCRIPT>

</BODY>
</HTML>

여기서 자바스크립트는 iframe이후에 넣어 줘야 합니다.
그럼 위의 파일을 html로 만들고 브라우저에서 읽어오면 편집 가능 하도록 되어 있을 것 입니다.


2. 편집툴바 만들기

<HEAD>와 </HEAD>사이에 자바 스크립트 만듭니다.


<SCRIPT langauge="javascript">
    function htmledit(excute){
    dhtmlframe.document.execCommand(excute);
}
</SCRIPT>


그리고 툴바에는 볼드,이탤릭,언더라인 만들고 다음 과 링크를 연결 합니다.


<A href="javascript:htmledit('BOLD');">볼드</A>
<A href="javascript:htmledit('italic');">이탤릭</A>
<A href="javascript:htmledit('underline');">언더라인</A>


다음 예제를 저장 하고 브라우저를 통해 실행 합니다.


<HTML>

<HEAD>
<TITLE>웹에디터 예제2</TITLE>

<SCRIPT langauge="javascript">
function htmledit(excute){
        dhtmlframe.document.execCommand(excute);
}
</SCRIPT>
</HEAD>

<BODY>
<A href="javascript:htmledit('bold');">볼드</A>
<A href="javascript:htmledit('italic');">이탤릭</A>
<A href="javascript:htmledit('underline');">언더라인</A>
<p>
<IFRAME NAME=dhtmlframe></IFRAME>

<SCRIPT LANGUAGE="JavaScript">
<!-- JavaScript
    dhtmlframe.document.designMode = "On"
// - JavaScript - -->
</SCRIPT>
</BODY>

</HTML>


브라우저에서 편집 가능 한것을 볼수 있습니다.


볼드,이탤릭,언더라인 이외 무엇이 있을까요.

cut -  자르기
copy - 복사
paste - 붙여넣기
justifyleft - 좌측정렬
justifycenter - 중심정렬
justifyright - 우측정렬
insertorderedlist - 점표시목록
insertunorderedlist - 숫자목록
outdent - 들여쓰기 줄이기
indent- 들여쓰기 늘이기
createlink - 링크
fontname - 글꼴
fontSize - 글사이즈


<A href="javascript:htmledit('cut');">자르기</a>

형식등로 사용 할 수 있습니다.


그러나 글꼴 이나 글크기등은 값이 필요 합니다. 이경우 htmledit(excute)에서 excute이외 하나더 인자가 필요 합니다. values 라고 하나 더 추가 합니다.


<SCRIPT langauge="javascript">
function htmledit(excute,values){
        if(values==null){
                dhtmlframe.document.execCommand(excute);
        }
        else
                dhtmlframe.document.execCommand(excute,"",values);
        }
}
</SCRIPT>


글꼴을 궁서체로 만들고 싶으면

htmledit('fontname','궁서체') 가 됩니다. 다음 예제를 테스트 해보세요


<HTML>

<HEAD>
<TITLE>웹에디터 예제3</TITLE>
<SCRIPT langauge="javascript">
function htmledit(excute,values)
{
        if(values==null)
        {
                dhtmlframe.document.execCommand(excute);
        }
        else
        {
                dhtmlframe.document.execCommand(excute,"",values);
        }
}
</SCRIPT>
</HEAD>

<BODY>
<A href="javascript:htmledit('cut');">자르기</a>
<A href="javascript:htmledit('copy');">복사</a>
<A href="javascript:htmledit('paste');">붙여넣기</a>
<A href="javascript:htmledit('justifyleft');">좌측정렬</a>
<A href="javascript:htmledit('justifycenter');">중심정렬</a>
<A href="javascript:htmledit('justifyright');">우측정렬</a>
<A href="javascript:htmledit('insertorderedlist');">점표시목록</a>
<A href="javascript:htmledit('insertunorderedlist');">숫자목록</a>
<A href="javascript:htmledit('outdent');">들여쓰기줄이기</a>
<A href="javascript:htmledit('indent');">들여쓰기늘이기</a>
<A href="javascript:htmledit('createlink');">링크</a><BR>
글꼴 &gt;
<A href="javascript:htmledit('fontname','굴림');">굴림</a>
<A href="javascript:htmledit('fontname','궁서');">궁서</a>
글크기 &gt;
<A href="javascript:htmledit('fontSize',2);">2</a>
<A href="javascript:htmledit('fontSize',3);">3</a>
<A href="javascript:htmledit('fontSize',4);">4</a>
<A href="javascript:htmledit('bold');">볼드</A>
<A href="javascript:htmledit('italic');">이탤릭</A>
<A href="javascript:htmledit('underline');">언더라인</A>
<P><IFRAME NAME=dhtmlframe></IFRAME>

<SCRIPT LANGUAGE="JavaScript">
<!-- JavaScript
    dhtmlframe.document.designMode = "On"
// - JavaScript - -->
</SCRIPT>
</BODY>

</HTML>


3. 값넘기기

이제까지 HTML과 자바스크립트로만 이용 해서 만들었습니다. 이렇게 만든 값을 CGI(PHP,ASP..)등으로 보내고야 합니다. 아시다 싶이 값을 전송 하는것은 form태그를 시용 합니다.

form을 만듭니다. 그리고 form의 속성중 name을 form으로 만들고(아무거나 만들어도 상관 없겠죠)


<IFRAME>밑에 <TEXTAREA></TEXTAREA>을 만듭니다. 이름은 아무거나.. 저는 comment라 지었습니다.


그리고 HEAD자바 스크립트에 다음과 같이 추가 합니다.


function datasubmit()
{
        form.comment.value = dhtmlframe.document.body.innerHTML;
}


아래의 예제를 실행 하고 HTML보기를 클릭 하면 HTML소스가 <TEXTAREA>에 복사 되는 것을 볼 수 있습니다.

그상태에서 다른 CGI에서 comment로 변수로 읽어 저장 되는 것 입니다.


<HTML>

<HEAD>
<TITLE>웹에디터 예제4</TITLE>
<SCRIPT langauge="javascript">
function htmledit(excute,values)
{
        if(values==null)
        {
                dhtmlframe.document.execCommand(excute);
        }
        else
        {
                dhtmlframe.document.execCommand(excute,"",values);
        }
}
function datasubmit()
{
        form.comment.value = dhtmlframe.document.body.innerHTML;
}
</SCRIPT>
</HEAD>

<BODY>
<form name=form>
<A href="javascript:htmledit('cut');">자르기</a>
<A href="javascript:htmledit('copy');">복사</a>
<A href="javascript:htmledit('paste');">붙여넣기</a>
<A href="javascript:htmledit('justifyleft');">좌측정렬</a>
<A href="javascript:htmledit('justifycenter');">중심정렬</a>
<A href="javascript:htmledit('justifyright');">우측정렬</a>
<A href="javascript:htmledit('insertorderedlist');">점표시목록</a>
<A href="javascript:htmledit('insertunorderedlist');">숫자목록</a>
<A href="javascript:htmledit('outdent');">들여쓰기줄이기</a>
<A href="javascript:htmledit('indent');">들여쓰기늘이기</a>
<A href="javascript:htmledit('createlink');">링크</a><BR>
글꼴 &gt;
<A href="javascript:htmledit('fontname','굴림');">굴림</a>
<A href="javascript:htmledit('fontname','궁서');">궁서</a>
글크기 &gt;
<A href="javascript:htmledit('fontSize',2);">2</a>
<A href="javascript:htmledit('fontSize',3);">3</a>
<A href="javascript:htmledit('fontSize',4);">4</a>
<A href="javascript:htmledit('bold');">볼드</A>
<A href="javascript:htmledit('italic');">이탤릭</A>
<A href="javascript:htmledit('underline');">언더라인</A>
<A href="javascript:htmledit('fontname');">언더라인</A>
<P><IFRAME NAME=dhtmlframe></IFRAME>
<P><TEXTAREA NAME="comment" ROWS="3"></TEXTAREA></P>
<P><A href="javascript:datasubmit()">HTML보기</a>
<SCRIPT LANGUAGE="JavaScript">
<!-- JavaScript
    dhtmlframe.document.designMode = "On"
// - JavaScript - -->
</SCRIPT>

</form>
</BODY>

</HTML>


그럼 다른 CGI(PHP,ASP..)을 보내기 위해 소스를 다듬어 보도록 하겠습니다.
먼저 <TEXTAREA>에 STYLE="display: none"을 추가 합니다.
그럼 <TEXTAREA STYLE="display: none">가 되며 브라우저에서 보이지 않게 됩니다.
그리고 <form>에는 제대로 보내고자 하는 CGI위치와 method를 지정 합니다.

<A href="javascript:datasubmit()">HTML보기</a>을
<input type="submit" value="확인" Onclick="datasubmit()"> 으로 바꿉니다.


<HTML>

<HEAD>
<TITLE>웹에디터 예제5</TITLE>
<SCRIPT langauge="javascript">
function htmledit(excute,values)
{
        if(values==null)
        {
                dhtmlframe.document.execCommand(excute);
        }
        else
        {
                dhtmlframe.document.execCommand(excute,"",values);
        }
}
function datasubmit()
{
        form.comment.value = dhtmlframe.document.body.innerHTML;
}
</SCRIPT>
</HEAD>

<BODY>
<form name=form method=post action="test.php">
<A href="javascript:htmledit('cut');">자르기</a>
<A href="javascript:htmledit('copy');">복사</a>
<A href="javascript:htmledit('paste');">붙여넣기</a>
<A href="javascript:htmledit('justifyleft');">좌측정렬</a>
<A href="javascript:htmledit('justifycenter');">중심정렬</a>
<A href="javascript:htmledit('justifyright');">우측정렬</a>
<A href="javascript:htmledit('insertorderedlist');">점표시목록</a>
<A href="javascript:htmledit('insertunorderedlist');">숫자목록</a>
<A href="javascript:htmledit('outdent');">들여쓰기줄이기</a>
<A href="javascript:htmledit('indent');">들여쓰기늘이기</a>
<A href="javascript:htmledit('createlink');">링크</a><BR>
글꼴 &gt;
<A href="javascript:htmledit('fontname','굴림');">굴림</a>
<A href="javascript:htmledit('fontname','궁서');">궁서</a>
글크기 &gt;
<A href="javascript:htmledit('fontSize',2);">2</a>
<A href="javascript:htmledit('fontSize',3);">3</a>
<A href="javascript:htmledit('fontSize',4);">4</a>
<A href="javascript:htmledit('bold');">볼드</A>
<A href="javascript:htmledit('italic');">이탤릭</A>
<A href="javascript:htmledit('underline');">언더라인</A>
<A href="javascript:htmledit('fontname');">언더라인</A>
<P><IFRAME NAME=dhtmlframe></IFRAME>
<P><TEXTAREA NAME="comment" ROWS="3"></TEXTAREA></P>
<P><input type="submit" value="확인" Onclick="datasubmit()">
<SCRIPT LANGUAGE="JavaScript">
<!-- JavaScript
    dhtmlframe.document.designMode = "On"
// - JavaScript - -->
</SCRIPT>

</form>
</BODY>

</HTML>


지금까지 공개 되었던 소스보다 간단하다는것을 알 수 있습니다. 하지만 중요한 요소는 다들어 가 있으며 여기서부터는 살을 붙이고 디자인도 바꾸면 됩니다. 그 몫은 여러분이 해야 할 일 입니다.

728x90

'Information' 카테고리의 다른 글

Javascript 에서 Querystring 뽑아내기  (0) 2007.03.03
개발자 등급 기준 -출처 Codeway-  (0) 2007.03.03
프로그래밍은 예술이다?  (0) 2007.03.03
728x90

Flash OBJECT and EMBED tag attributes

This document lists the required and optional attributes of the OBJECT and EMBED tags used to publish Flash movies.

For specific usage information for these attributes, refer to sections of the Using Flash manual devoted to using OBJECT and EMBED tags (exact headings vary among Flash versions). Information is also available in Macromedia Flash OBJECT and EMBED tag syntax (TechNote 4150).

For more information on scripting with Flash see Scripting with Flash.

Required attributes:

  • CLASSID - Identifies the ActiveX control for the browser. (See example code in TechNote 4150 for the correct value.) OBJECT only.
  • CODEBASE - Identifies the location of the Flash Player ActiveX control so that the browser can automatically download it if it is not already installed. OBJECT only. (See example code in TechNote 4150 for the correct value.)
  • WIDTH - Specifies the width of the movie in either pixels or percentage of browser window.
  • HEIGHT - Specifies the height of the movie in either pixels or percentage of browser window.
  • SRC - Specifies the location (URL) of the movie to be loaded. EMBED only.
  • PLUGINSPAGE - Identifies the location of the Flash Player plug-in so that the user can download it if it is not already installed. EMBED only. (See example code in TechNote 4150 for the correct value.)
  • MOVIE - Specifies the location (URL) of the movie to be loaded. OBJECT only.

Optional attributes and possible values:

  • ID - Identifies the Flash movie to the host environment (a web browser, for example) so that it can be referenced using a scripting language. OBJECT-specific.
  • NAME - Identifies the Flash movie to the host environment (a web browser, typically) so that it can be referenced using a scripting language such as JavaScript or VBScript. EMBED-specific.
  • SWLIVECONNECT - (true, false) Specifies whether the browser should start Java when loading the Flash Player for the first time. The default value is false if this attribute is omitted. If you use JavaScript and Flash on the same page, Java must be running for the FSCommand to work.
  • PLAY - (true, false) Specifies whether the movie begins playing immediately on loading in the browser. The default value is true if this attribute is omitted.
  • LOOP - (true, false) Specifies whether the movie repeats indefinitely or stops when it reaches the last frame. The default value is true if this attribute is omitted.
  • MENU (true, false)
    • True displays the full menu, allowing the user a variety of options to enhance or control playback.
    • False displays a menu that contains only the Settings option and the About Flash option.
  • QUALITY - (low, high, autolow, autohigh, best )
    • Low favors playback speed over appearance and never uses anti-aliasing.
    • Autolow emphasizes speed at first but improves appearance whenever possible. Playback begins with anti-aliasing turned off. If the Flash Player detects that the processor can handle it, anti-aliasing is turned on.
    • Autohigh emphasizes playback speed and appearance equally at first but sacrifices appearance for playback speed if necessary. Playback begins with anti-aliasing turned on. If the actual frame rate drops below the specified frame rate, anti-aliasing is turned off to improve playback speed. Use this setting to emulate the View > Antialias setting in Flash.
    • Medium applies some anti-aliasing and does not smooth bitmaps. It produces a better quality than the Low setting, but lower quality than the High setting.
    • High favors appearance over playback speed and always applies anti-aliasing. If the movie does not contain animation, bitmaps are smoothed; if the movie has animation, bitmaps are not smoothed.
    • Best provides the best display quality and does not consider playback speed. All output is anti-aliased and all bitmaps are smoothed.
  • SCALE - (showall, noborder, exactfit)
    • Default (Show all) makes the entire movie visible in the specified area without distortion, while maintaining the original aspect ratio of the movie. Borders may appear on two sides of the movie.
    • No Border scales the movie to fill the specified area, without distortion but possibly with some cropping, while maintaining the original aspect ratio of the movie.
    • Exact Fit makes the entire movie visible in the specified area without trying to preserve the original aspect ratio. Distortion may occur.
  • ALIGN - (l, t, r, b)
    • Default centers the movie in the browser window and crops edges if the browser window is smaller than the movie.
    • Left, Right, Top, and Bottom align the movie along the corresponding edge of the browser window and crop the remaining three sides as needed.
  • SALIGN - (l, t, r, b, tl, tr, bl, br)
    • L, R, T, and B align the movie along the left, right, top or bottom edge, respectively, of the browser window and crop the remaining three sides as needed.
    • TL and TR align the movie to the top left and top right corner, respectively, of the browser window and crop the bottom and remaining right or left side as needed.
    • BL and BR align the movie to the bottom left and bottom right corner, respectively, of the browser window and crop the top and remaining right or left side as needed.
  • WMODE - (window, opaque, transparent) Sets the Window Mode property of the Flash movie for transparency, layering, and positioning in the browser.
    • Window movie plays in its own rectangular window on a web page.
    • Opaque the movie hides everything on the page behind it.
    • Transparent the background of the HTML page shows through all transparent portions of the movie, this may slow animation performance.

      Note: This property is not supported in all browsers and platforms. For more information about WMODE see How to make a Flash movie with a transparent background (TechNote 14201).
  • BGCOLOR - (#RRGGBB, hexadecimal RGB value) Specifies the background color of the movie. Use this attribute to override the background color setting specified in the Flash file. This attribute does not affect the background color of the HTML page.
  • BASE - ( . or base directory or URL) Specifies the base directory or URL used to resolve all relative path statements in the Flash Player movie. This attribute is helpful when your Flash Player movies are kept in a different directory from your other files.
  • FLASHVARS (variable to pass to Flash Player) Requires Macromedia Flash Player 6 or later.
    • Used to send root level variables to the movie. The format of the string is a set of name=value combinations separated by '&'.
    • Browsers will support string sizes of up to 64KB (65535 bytes) in length.
    • For more information on FlashVars, please refer to Using FlashVars to pass variables to a SWF (TechNote 16417).

Note: Values in italics indicate that the developer chooses the value.

Last updated: May 29, 2003
Easy Link this TechNote

http://www.macromedia.com/go/tn_12701

Easy Links give you a simpler URL to reference in emails, as bookmarks… anywhere.


http://www.macromedia.com/cfusion/knowledgebase/index.cfm?id=tn_12701

728x90

'Information' 카테고리의 다른 글

insertAdjacentElement Method  (0) 2007.03.03
보기좋은 코딩원칙1-80칸의 원칙  (0) 2007.03.03
CSS Properties To JavaScript Reference Conversion  (0) 2007.03.03
728x90
htmlarg은?
에디트플러스2에 붙여쓸수 있는 태그 정리기 입니다.
복잡한 태그들을 정렬시켜줍니다.

* 실행파일


* 소스코드

설치/실행 동영상


설치시 인수 설정방법 : 인텐드수(0~9또는 t) 인덴트할태그들 안할태그들 ($CurSel)

* 인덴트가 현재위치에서 줄어드는 경우에도 동작하도록 수정했습니다.
* php와 html주석은 처리 안도록 수정했습니다.

출처 : 킬레인넷 v12.0
728x90

'Software' 카테고리의 다른 글

각종 Viewer  (0) 2007.04.10
Foxit Reader  (0) 2007.04.07
[FreeMind V0.8.0]생각을 정리하는 마인드맵  (0) 2007.02.11

+ Recent posts